HELP & GUIDES

How QuoteIron
works.

Seventeen short walkthroughs — the jobs you'll actually do, start to finish. No help-desk runaround. Every screenshot below is the real app, not a mockup.

These steps follow the iPhone and Android apps. Along the bottom you have Jobs, Schedule, Book and Clients, with a round orange compose button at the right end for anything new. Settings is the button with your initials at the top right.

GUIDE 01

Forge your book

First run, one time. The book builds itself, you punch in your numbers, and 1100+ job templates become your flat-rate price book — priced from your rate, not ours.

  1. Download the app and open it. Your book builds itself on first open — all fourteen trades: electrical, plumbing, HVAC, appliance and garage-door repair, pressure washing, lawn care, handyman, painting, drywall, roofing, flooring, pool maintenance, and junk removal. No account needed to start.
  2. The Finish Setting Up card (on Jobs and at the top of Settings) walks you through the rest. Tap the business card at the top of Settings to set your business name, work email and logo, and open Settings → Trades to pick your trade.
  3. In Settings → Pricing, set your numbers: your Labor Rate, your Materials Markup, and your Service Call fee. Settings saves as you type, and every template prices itself from your numbers in a second.

Why it matters: change your rate later in Settings and the whole book reprices instantly. Every job stays editable — the templates carry the structure, you carry the price.

Want to see a trade’s rows before you download? Each trade has a sample page — for example the electrical flat-rate price book, the handyman price list, the appliance repair price guide and the flooring price book.
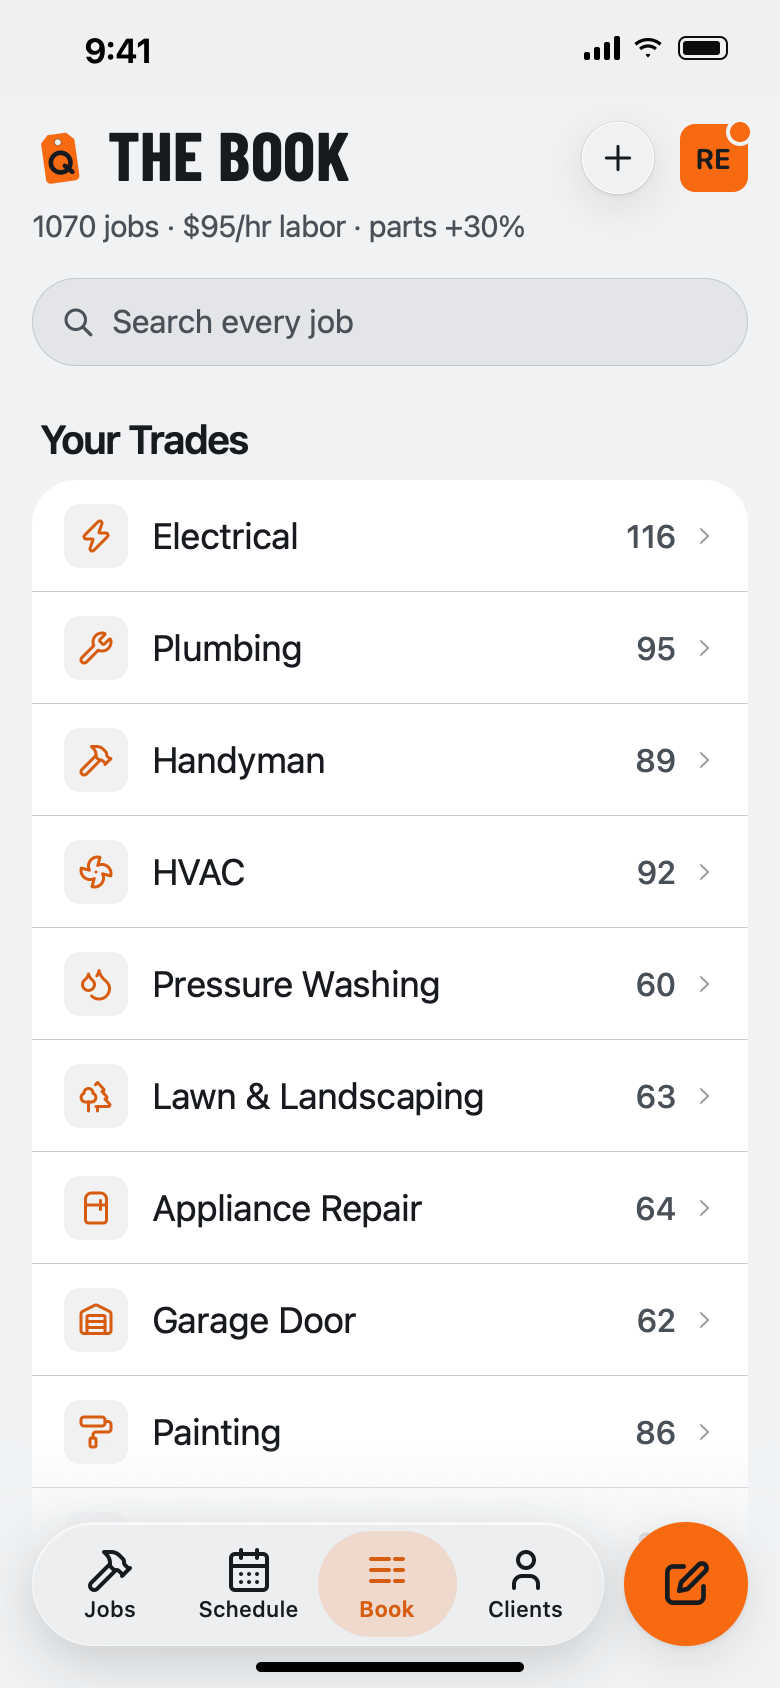
The Book tab: 1100+ jobs at $95 an hour, with the Your Trades list — Electrical 116, Plumbing 95, Handyman 89, HVAC 92, Pressure Washing 60 and more.
GUIDE 02

Send your first quote

You're standing in the driveway. Build a firm price in about 90 seconds and send it as a link or a PDF.

  1. Tap the round orange compose button at the right end of the tab bar and choose Estimate. Pick the client, or tap New Client to add one on the spot.
  2. Tap Add from Book, search, and tap the jobs you're doing. Prices land as you go.
  3. Need something the book doesn't have? Tap Custom Line and name your own price.
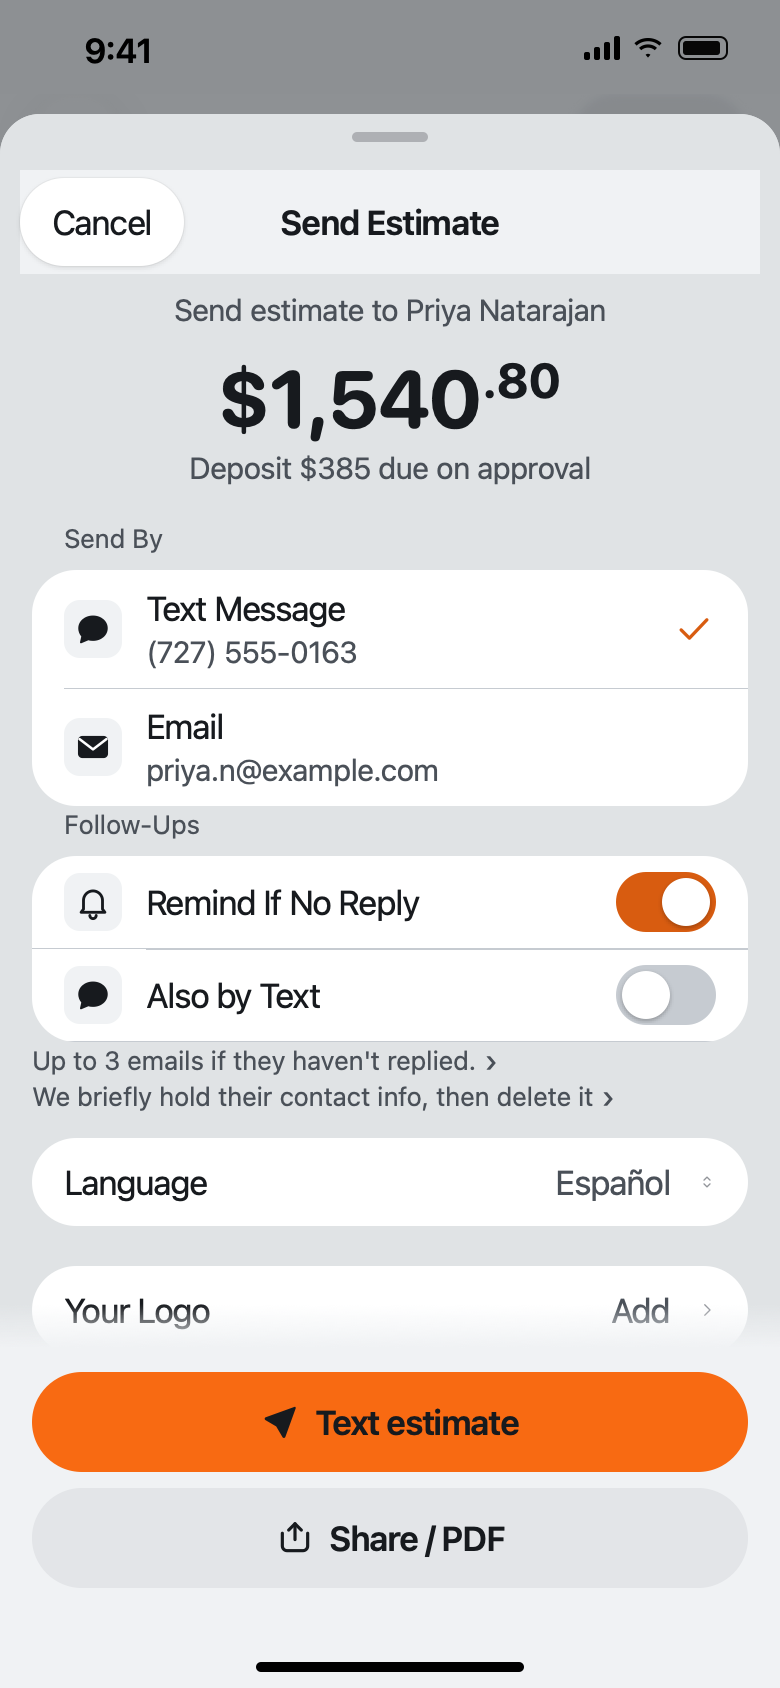
  4. Tap Send Estimate, then under Send By pick Text Message or Email and tap the orange send button to send the link — or tap Share / PDF to hand it over any way you like. The first time you send, QuoteIron asks you to create your free account.

Why it matters: the link tells you when it's opened (it turns Viewed) and when it's approved (it turns Won) — so you never send another "did you get my quote" text.

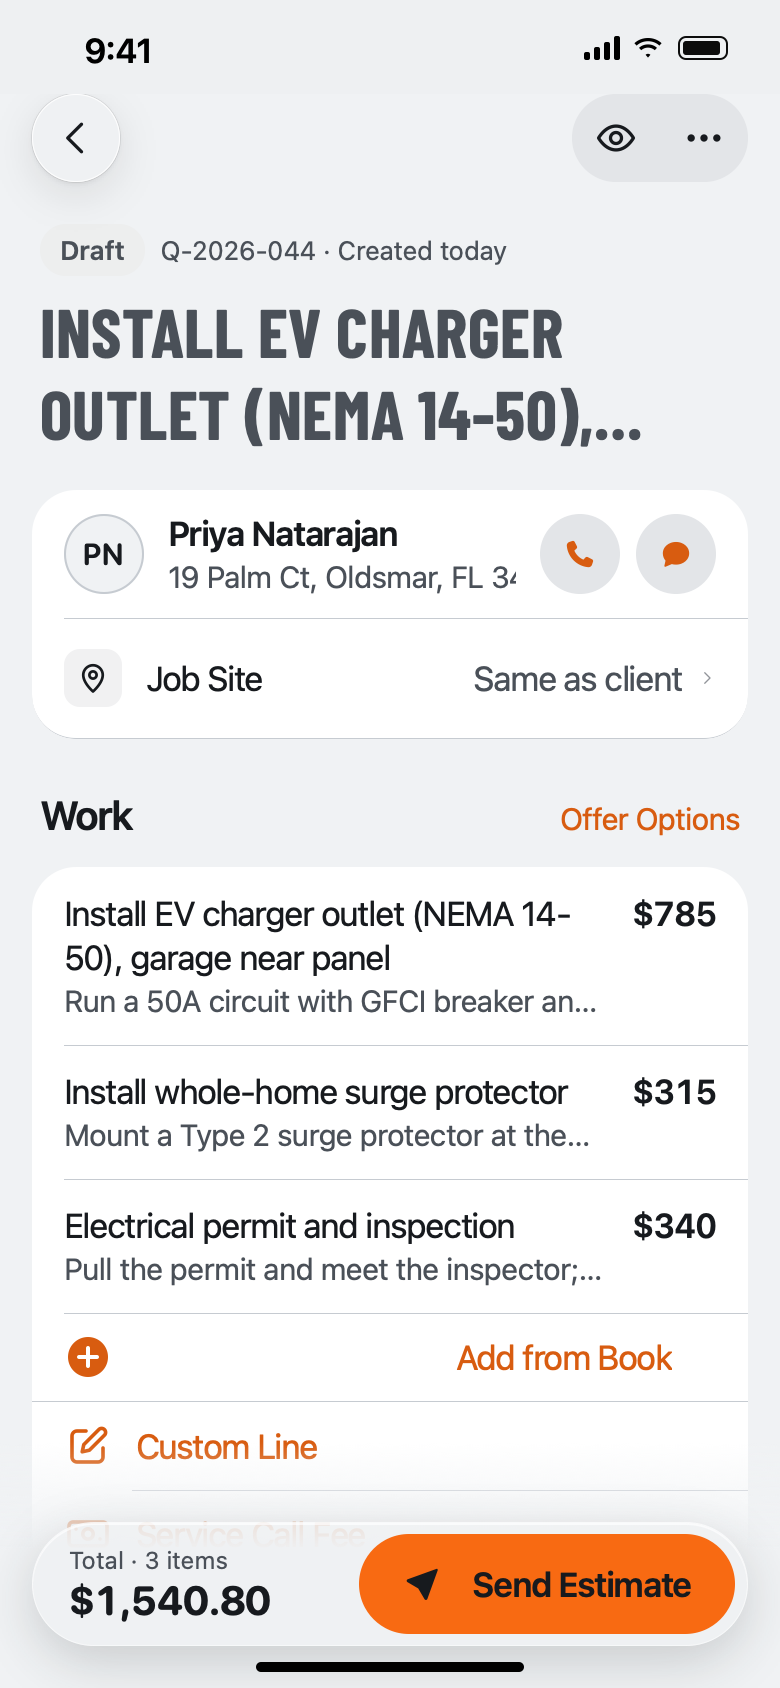
A draft estimate for Priya Natarajan under Work: EV charger outlet $785, whole-home surge protector $315, electrical permit and inspection $340, with Add from Book, Custom Line and a Send Estimate button below.
GUIDE 03

Get it signed in the driveway

Close it while you're standing there. Your customer signs on your phone — or on theirs, from the share link.

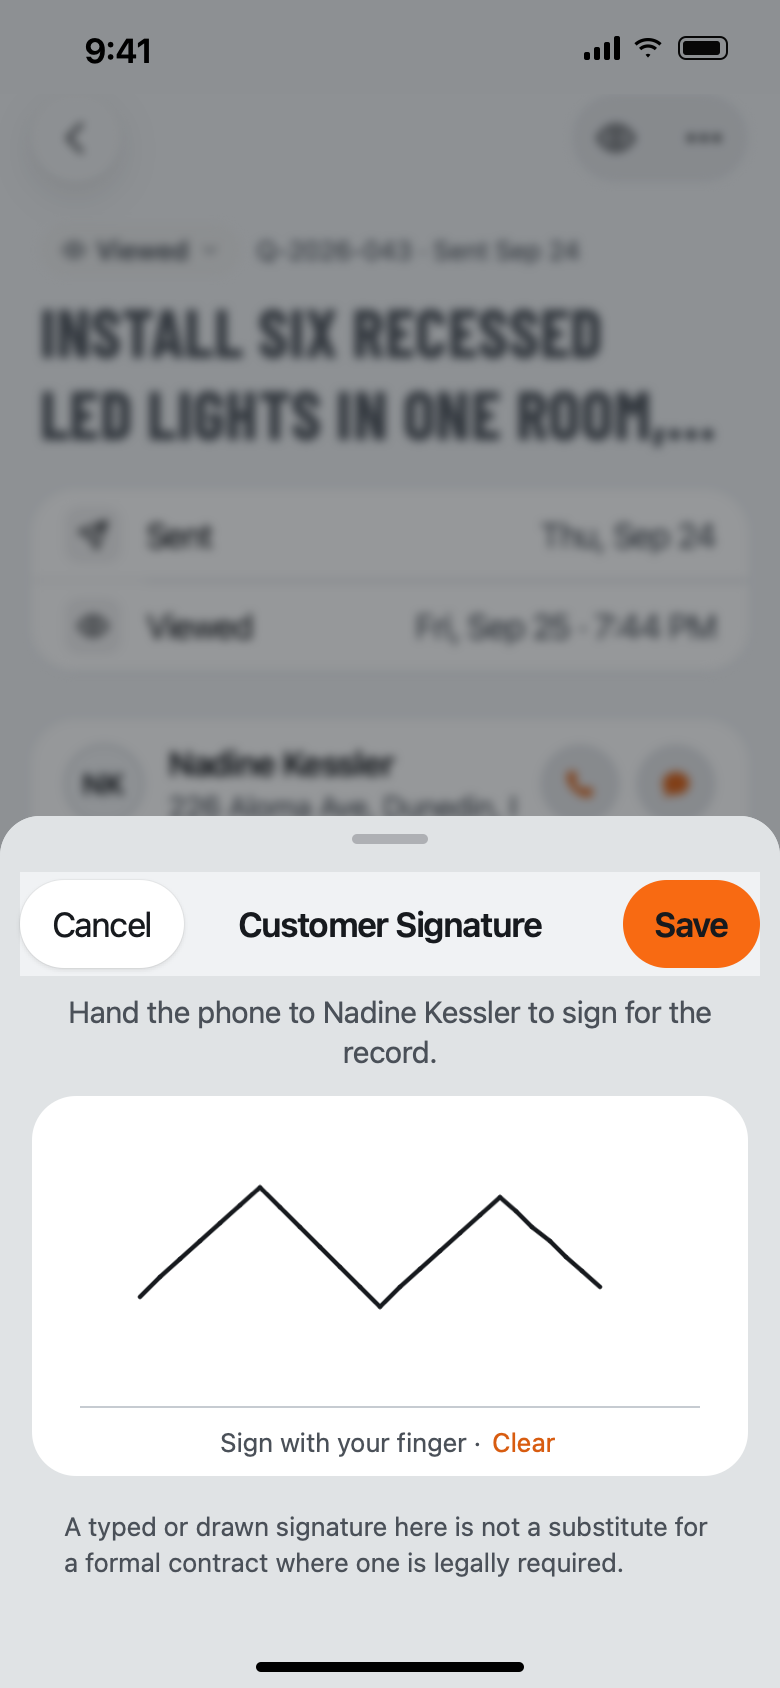
  1. Open the estimate and tap Sign on This Phone.
  2. Hand them your phone. They sign with a finger on the Customer Signature sheet.
  3. Tap Save. The estimate flips to Won and stamps their name and the date.
  4. Or: they open the share link and sign there — same result, no hands on your phone.

Why it matters: the signature prints on the PDF. It's proof you agreed on a price — not a substitute for a formal contract where the law requires one.

The Customer Signature sheet: Hand the phone to Nadine Kessler to sign, a signature pad reading Sign with your finger, and Cancel and Save buttons.
GUIDE 04

Give them good-better-best

Let the customer choose their own price. Put up to three tiers on one quote and let them pick.

  1. In the estimate, tap Offer Options.
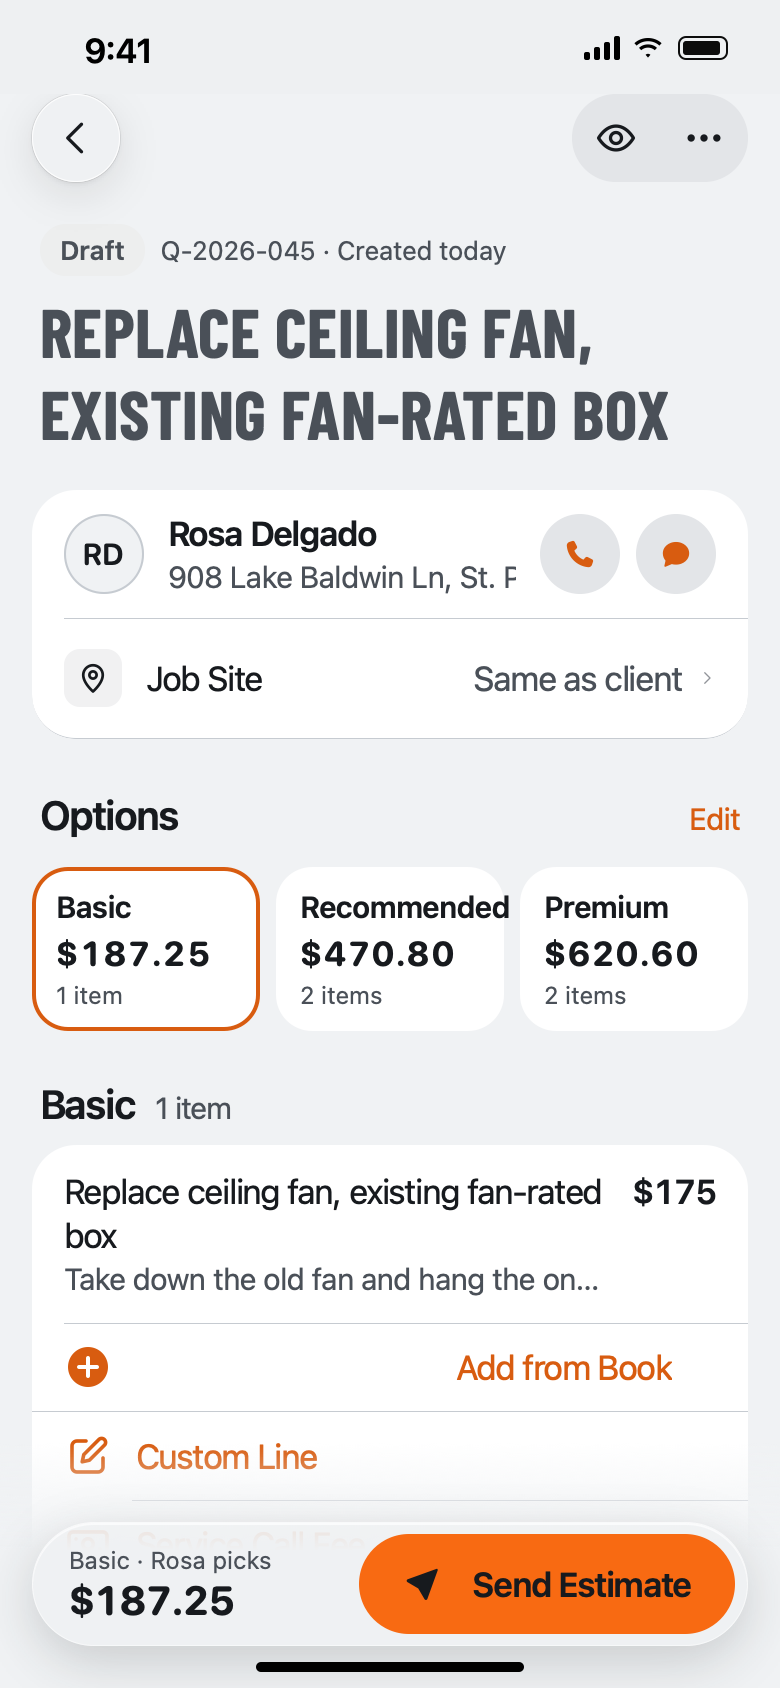
  2. You get a Basic, Recommended, and Premium option — rename them however you like, and tap Add an Option if you want another.
  3. Tap an option, then add the jobs that belong in it. Each option prices itself.
  4. Send it. The customer taps the option they want.

Why it matters: when you turn their pick into an invoice, the other two tiers drop away — the invoice collapses to exactly what they chose.

An estimate with Offer Options turned on: Basic $187.25, Recommended $470.80 and Premium $620.60 cards above the Basic option's line items.
GUIDE 05

Put photos on the quote

Show them the corroded panel or the cracked spring. Then nobody argues about what you found.

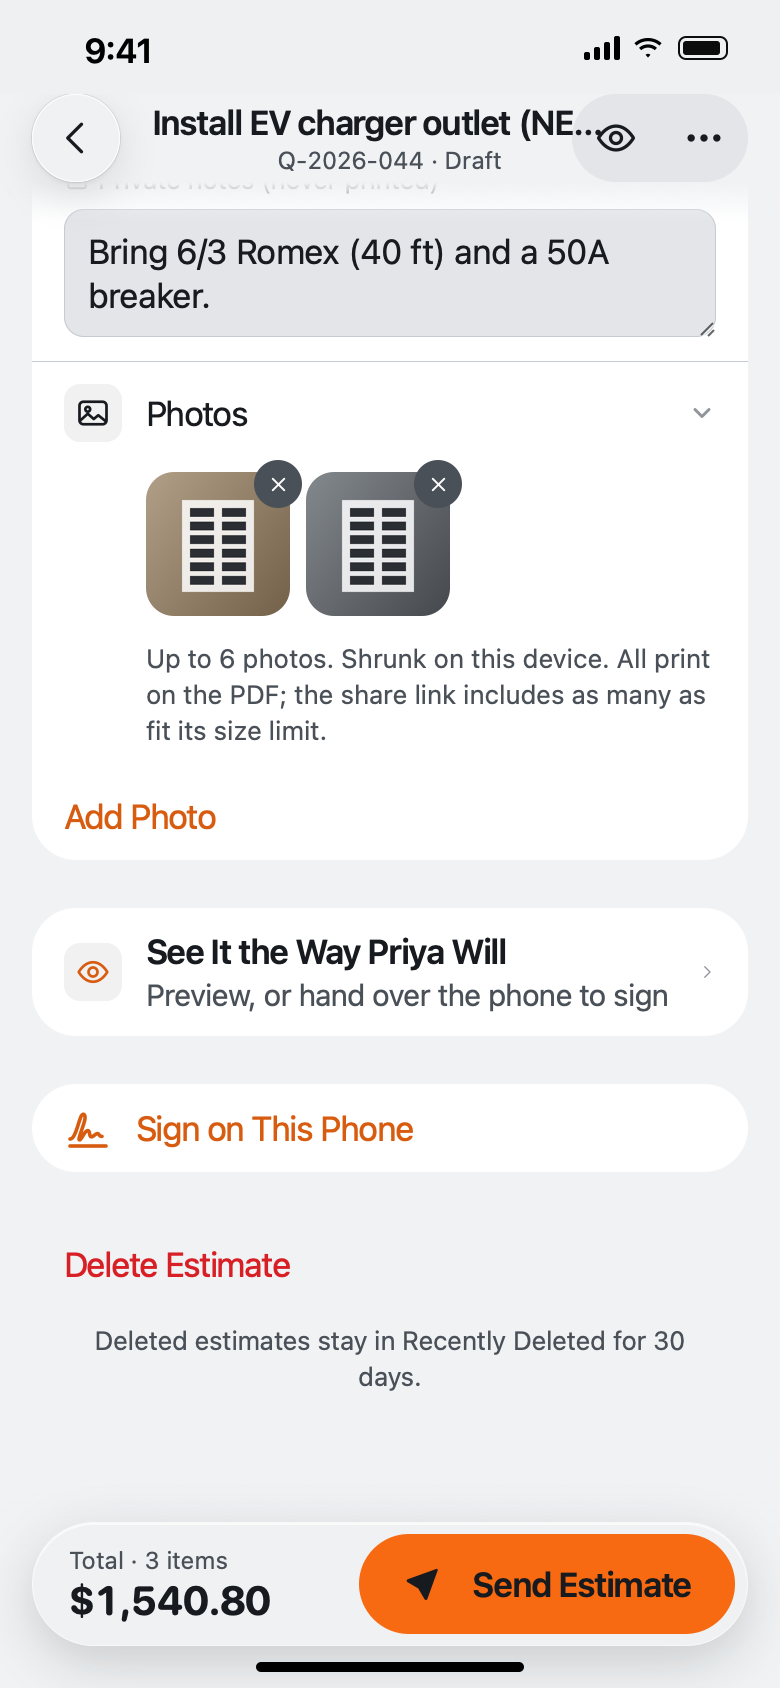
  1. In the estimate, scroll to Photos and tap it, then tap Add Photo.
  2. Snap a shot or pick one from your camera roll. Up to six per job.
  3. They shrink on your phone, so the quote stays small and sends fast.
  4. Finished the job? On an invoiced or paid job, add a Before photo and an After photo. They show on the customer's document page and in the PDF.

Why it matters: every photo prints on the PDF, and as many as fit ride along in the share link your customer opens.

The Photos section of an estimate with two photos, the Up to 6 photos note and an Add Photo link, above Sign on This Phone.
GUIDE 06

Turn a win into an invoice

Won the job? One tap turns the quote into an invoice — same numbers, new label.

  1. Open the won estimate and tap Make Invoice.
  2. Want money up front to schedule? Open Discount, Deposit, Markup and set a Deposit.
  3. Tap Send Invoice and send it the same way you sent the estimate.
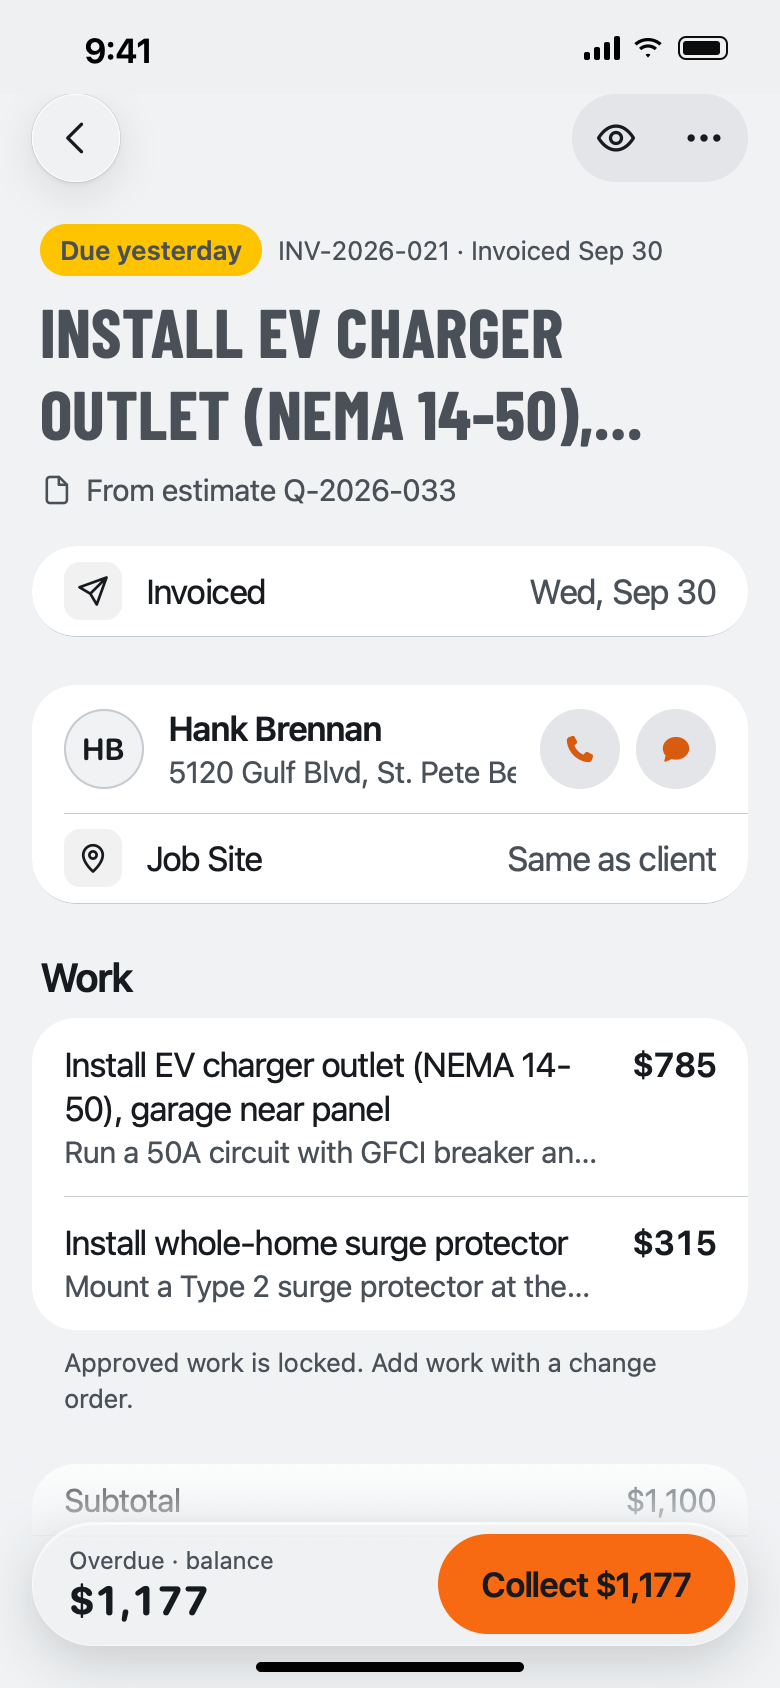
  4. When they pay, tap Collect at the bottom: record the cash, check or Zelle — or, with Pro, send the card link. Each payment lands in the invoice's payment history with its own Send receipt link, and once it's paid in full the invoice reads Paid in full.

Why it matters: every paid invoice lands in your Income CSV — gross receipts your accountant can actually use.

An invoice for Hank Brennan, due yesterday: EV charger outlet $785 and surge protector $315, with a Collect $1,177 button at the bottom.
GUIDE 07

Get paid your way

You take money how you already take it — and with Pro, card payments go straight to your own Stripe account.

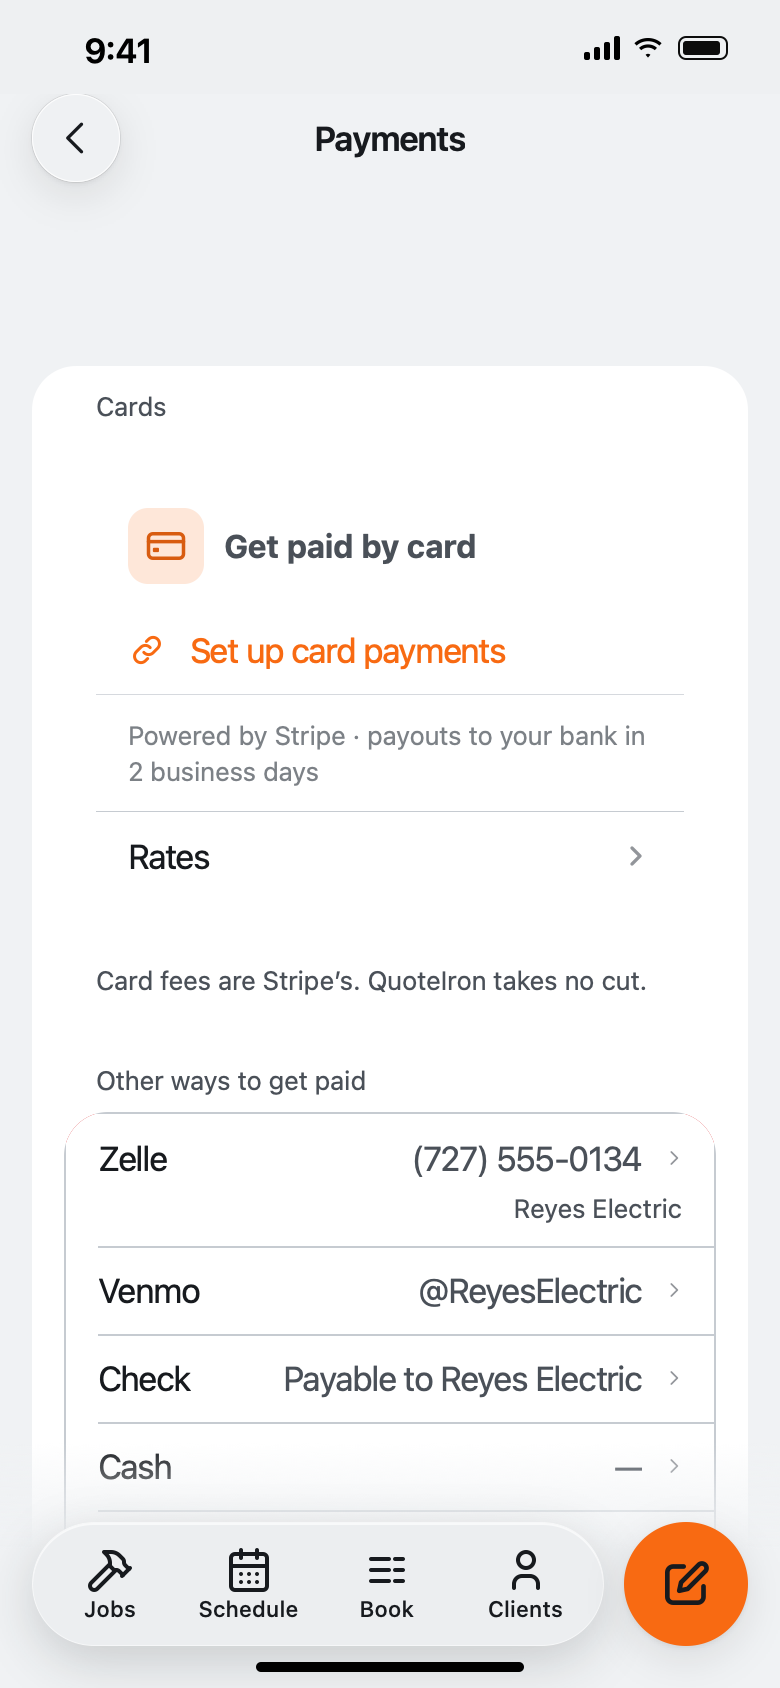
  1. Go to Settings → Payments and, under Other ways to get paid, tap + Add payment method.
  2. Pick a service — Zelle, Venmo, Cash App, PayPal, a card or payment link — and paste your link or handle.
  3. Add as many as you want. Settings saves as you go.
  4. On any invoice, tap Payment methods to choose Card and bank or Bank only.
  5. On Pro, tap Set up card payments under Get paid by card (same screen) to connect your own Stripe account. Your customer pays on Stripe's checkout and the job marks itself paid.
  6. Want a deposit first? Set a deposit as a percentage of the total, up to 100%, and the customer sees it on the document.
  7. Split a job into two to five payment steps, each with its own amount, and mark each step paid as the money comes in. Payment steps are on both Free and Pro.
  8. On Pro, Settings → Payments also has an Accept bank payments (ACH) switch. Your customer can pay by bank on the invoice link, next to card. If a bank payment is returned, the job shows a returned notice so you can follow up.

Why it matters: they all show on every invoice your customer opens. QuoteIron never holds a dollar of it — card payments land in your own Stripe account; Stripe's standard fees apply and QuoteIron takes 0% (see how card fees compare across contractor apps).

Settings, Payments: Get paid by card with a Set up card payments button, then Other ways to get paid — Zelle, Venmo, Check and Cash — and + Add payment method.
GUIDE 08

Send it in their language

You work in English. Your customer reads Spanish. Pick their language when you send — QuoteIron remembers it for that client.

  1. Tap Send Estimate. On the send sheet, the Language row shows the language the document will go out in.
  2. Tap Language and choose Español. QuoteIron saves it on that client's profile, so their next estimate and invoice go out in Spanish too. You can also set it on the client's profile yourself.
  3. Send it. Their estimate lands reading PRESUPUESTO — and your app stays in English.

Why it matters: to change the language of the app itself, that's a separate row: Settings → Language. Your own custom lines print exactly as you typed them, and English is always the fallback — a missing line shows in English, never a blank.

The Send Estimate sheet for Priya Natarajan: Send By Text Message or Email, Follow-Ups with Remind If No Reply, and Language set to Español.
GUIDE 09

Never lose a job

Quotes go quiet. QuoteIron surfaces the ones worth chasing so the money doesn't slip through.

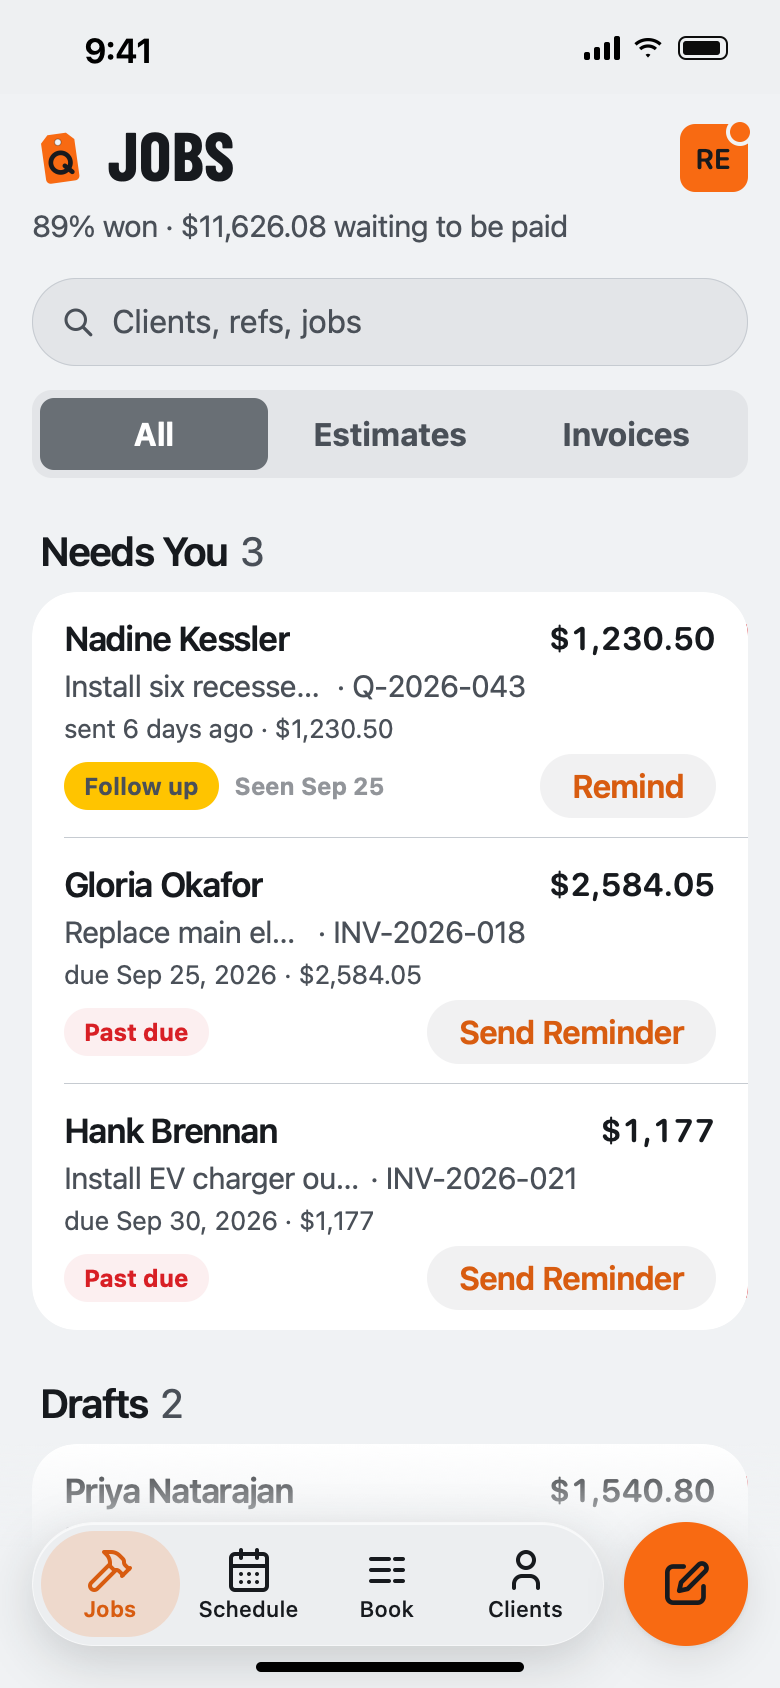
  1. Open Jobs. Anything unanswered past your follow-up window shows under Needs You, in Needs a Chase. To see one group at a time, filter Jobs by Leads, Waiting, or Unpaid. New customers can send you a lead from your own request page.
  2. Tap Remind to open the send sheet and text the customer again — you hit send. Invoices past their due date show under Overdue with a Send Reminder button that works the same way.
  3. Want a nudge yourself? Turn on Settings → Notifications. QuoteIron can also send your customer a polite reminder email for you (Pro adds texts). It's on by default; switch off Remind If No Reply in the Follow-Ups section of the send sheet to skip it — the defaults live in Settings → Follow-Ups — and your customer can opt out anytime.
  4. Won it? Open Schedule and tap the round orange compose button for a New Visit (a won job still waiting on a date also sits under Unscheduled, with a Schedule button). Set Starts and Duration, tap See the Day to drag the visit into place on the day's timeline — everything else you've booked that day shows beside it — and give it a title (a short note on what it's for). On the day, On My Way opens a text to the customer in your own Messages; you send it.
  5. Tap Add to my calendar on a visit to drop it on any calendar, or turn on Settings → Schedule → Add Visits to My Calendar to keep them all in step.
  6. Send a job tracker link. The customer follows the job from estimate sent to paid, with no login, and the page refreshes while it is open.

Why it matters: elsewhere this follow-up runs about $99 a month. Here it's just part of the app.

The Jobs tab: Needs You 3 — an estimate with a Remind button and two past-due invoices with Send Reminder buttons.
GUIDE 10

Your data, your book

It's yours, and it leaves with you. Bring it in from your old app, back it up, move phones, keep everything.

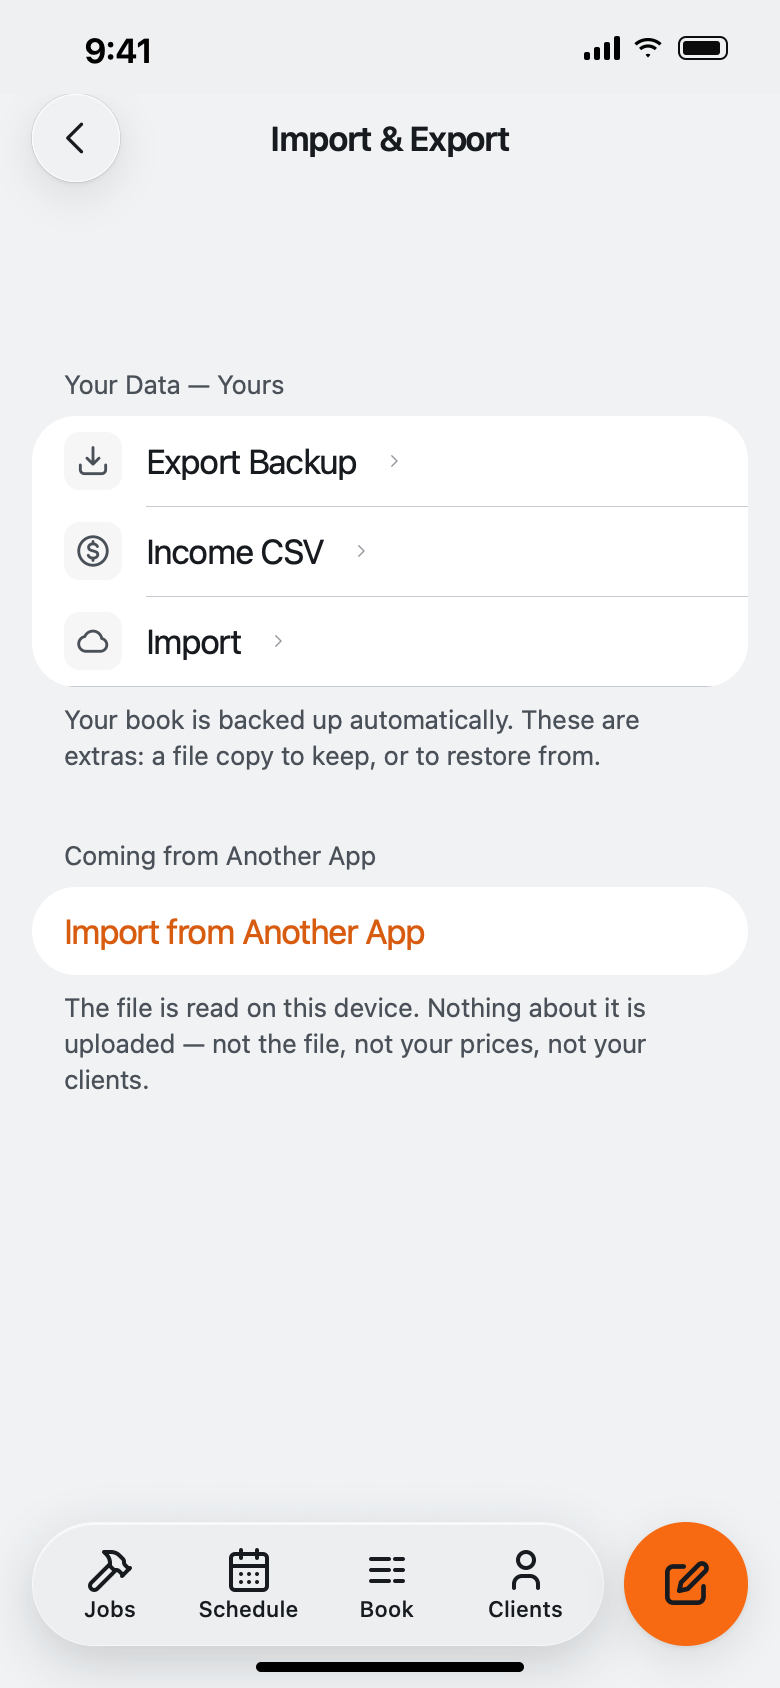
  1. Coming from another app? Open Settings → Import & Export and, under Coming from Another App, tap Import from Another App. Choose the CSV your old app exports — Jobber, Housecall Pro, Square, QuickBooks, FieldPulse, or anything that exports a CSV with column names. On Review Import you see what's in the file (Price Book or Clients) and its columns before anything is added; tap the import button, and Undo This Import takes the whole batch back out. The Book and Clients tabs show the same button while they're empty. The file is read on your device — nothing about it is uploaded.
  2. Settings → Import & Export → Export Backup saves a full JSON file you keep. Income CSV, right below it, gives your accountant gross receipts.
  3. Cloud backup switches on automatically the moment you have an account (see Settings → Backup & Devices) — an encrypted copy we physically can't read, unlocked with your passkey (Face ID / Touch ID) or the recovery code you're given once at setup.
  4. New phone? Sign in and tap Restore on Restore Your Book — your whole book comes back from the encrypted backup.
  5. After an invoice is paid, tap Ask for a Review to open a prefilled text or email for that Google review. QuoteIron may also ask your customer for a review after a paid invoice; turn that off in Settings → Reviews.

Why it matters: your book and photos are stored encrypted, so we can't read them. If you ever leave QuoteIron, you leave with everything.

Settings, Import & Export: Export Backup, Income CSV and Import under Your Data, and Import from Another App under Coming from Another App.
GUIDE 11

Mileage & time on site

Log the drives between your jobs and the time you spend at each one, at the IRS rate. Pro, on iPhone. It is off until you turn it on.

  1. Open Settings → Mileage & time and switch on Log drives and time on site. Set your Shop and Home addresses there too, so drives to and from them are recognised.
  2. iPhone asks for location. Choose Always. That lets QuoteIron notice when you arrive at or leave one of your own job addresses, home or shop while the app is closed. It watches only those places, only while this switch is on, and is never used for ads or tracking. If you pick a different option, trips can't be logged in the background.
  3. Miles are valued at the IRS rate, shown on the same screen. This Week shows your miles and time so far, and a weekly digest sums them up.
  4. Trips and visits are saved inside your own book, not in a separate account, and are included in your encrypted backup. Check them before you rely on them for a tax deduction.
  5. To stop, switch the setting off. Background location stops at once. You can also turn off Location for QuoteIron in iOS Settings.

Why it matters: your trips live in your book, which is end-to-end encrypted on your phone before it backs up. They stay on your phone and in your encrypted backup, and QuoteIron can't read them.

GUIDE 12

Add an office manager

Give one person their own login to send documents and record payments, without your billing or business settings. Free on every account.

  1. In Settings → ACCOUNT → Team, type their email and tap Invite by email. The invite lasts 72 hours.
  2. When they ask for access, you get a request on your phone. Check the code matches theirs, then tap Approve.
  3. Works in the web app and the browser portal today; the iPhone app has it in 2.1.6; Android gets it with its next update.

Full steps: Add an office manager, with screenshots, what they can and cannot do, and troubleshooting.

GUIDE 13

Your own request page

A link your customers tap to ask for a quote, in your colors. Every request lands in Jobs under Leads. Free on every account.

  1. In the web app, open Settings → APP → Customer requests and switch on Take requests online.
  2. Pick a theme and Light or Dark, and edit the jobs your customers can pick.
  3. Set your own work hours if you turn on pick a time. Customers never see them, and a request outside them is tagged After hours.
  4. Copy your link and share it. New requests show up under Leads in Jobs.

Full steps: Set up your request page, with screenshots, what your customer sees, and troubleshooting.

GUIDE 14

Tap to Pay on iPhone

Take a card in person on your iPhone, no reader. Pro, US only.

  1. Go to Settings → Payments and connect Stripe for card payments, if you have not already.
  2. Tap Tap to Pay on iPhone and accept Apple's Terms (one time).
  3. On any invoice, tap COLLECT → Tap to Pay on iPhone. Your customer holds their card, iPhone or Apple Watch to the top of your iPhone.

Requirements: iPhone XS or later running iOS 26, in the US. Stripe's standard in-person rate applies and QuoteIron takes 0%. Refunds are issued from your Stripe dashboard.

GUIDE 15

Send it to QuickBooks Online

Invoices and payments land in QuickBooks Online on their own. Pro.

  1. Go to Settings → Payments → QuickBooks, tap Connect QuickBooks, and sign in to Intuit.
  2. Pick the company.
  3. From then on, new invoices and payments go to QuickBooks on their own. Tap Sync now to push them at once.

One-way: nothing is pulled back into QuoteIron. Works in the web app and in the iPhone app, version 2.1.6 or later (on the App Store now).

GUIDE 16

Your customer's account

Every estimate, invoice and receipt you send them, in one place. Nothing to set up. Every plan.

  1. Your customer taps Your account on any estimate or invoice you sent.
  2. They enter their email and type the code (or tap Sign in in that email).
  3. They see every document from you and the live job status, and can approve estimates and pay invoices there.

Encrypted like your documents. No password, and nothing for you to configure.

GUIDE 17

Invite a contractor

Share your link with another contractor. You both get a free month of Pro.

  1. Open Settings and tap Invite a contractor (in the web app today; the row reaches the iPhone and Android apps in their next update). It appears once you have sent your first real quote to a customer.
  2. Tap Share invite link and send it by text, email or any app on your phone.
  3. Watch Sent, Joined and Earned on the same screen. Each invite shows its status.

Your friend gets their first month of Pro free when they sign up with your link. You get a free month when they send their first quote to a customer and the customer opens it. You can earn up to 12 free months a year. Program terms.

Enough reading.
Price a job.

The whole thing works offline, on your phone, in about 90 seconds. Free for 5 jobs a month — then $15.99, cancel anytime.

5 FREE JOBS A MONTH no credit card required GET THE APP
PricingGET THE APPFAQ